SMS Invitation
Sending invitations by SMS is simple for you and convenient for participants. If you have cell phone numbers from your contacts, your questionnaires can be in the hands of your audience in minutes – and their responses can be in your account!
Sending SMS internationally? Some countries are covered under our standard “included” rate. For others, costs may vary. Contact Us for more information specific to your project requirements.
Navigate to:
Send SMS Invitations
Here’s how:
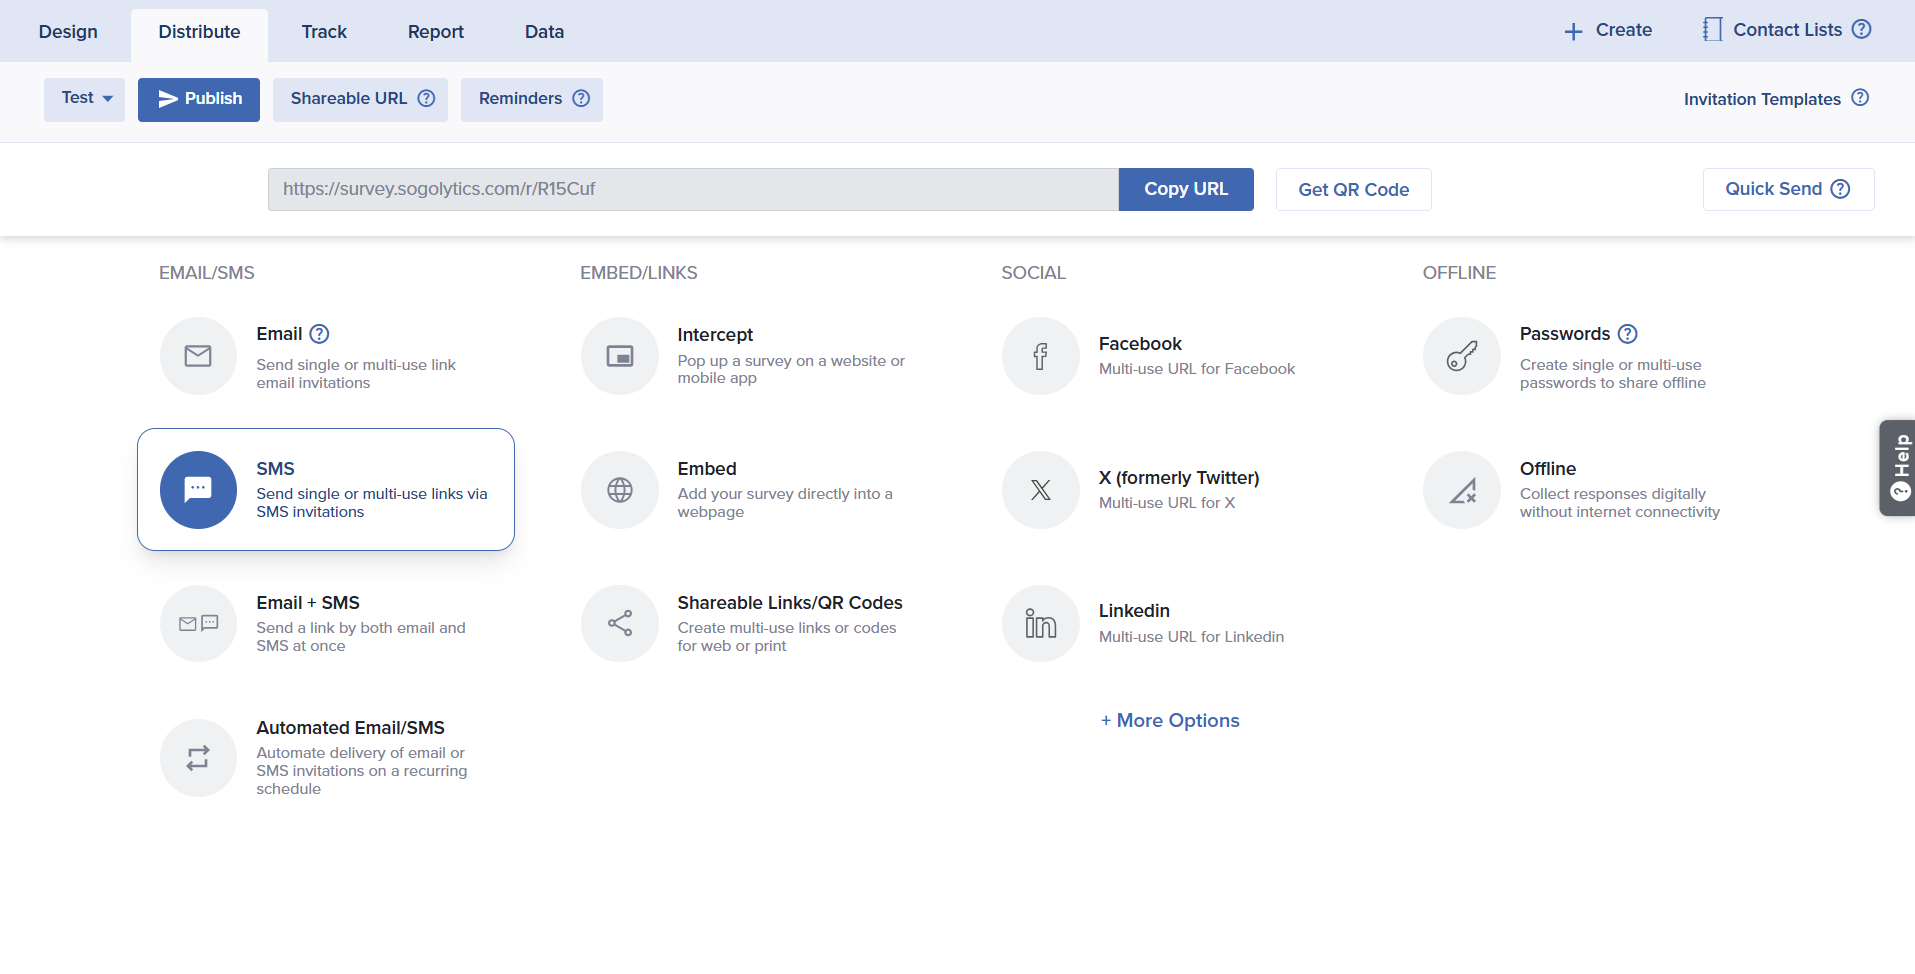
- Select your project, then click on the Publish icon.
- Select SMS invitation under Email/SMS.
- On the “Customize SMS Template” wizard, select the SMS Invitation Template according to your choice. You can customize the SMS Templates in the Invitation Templates.
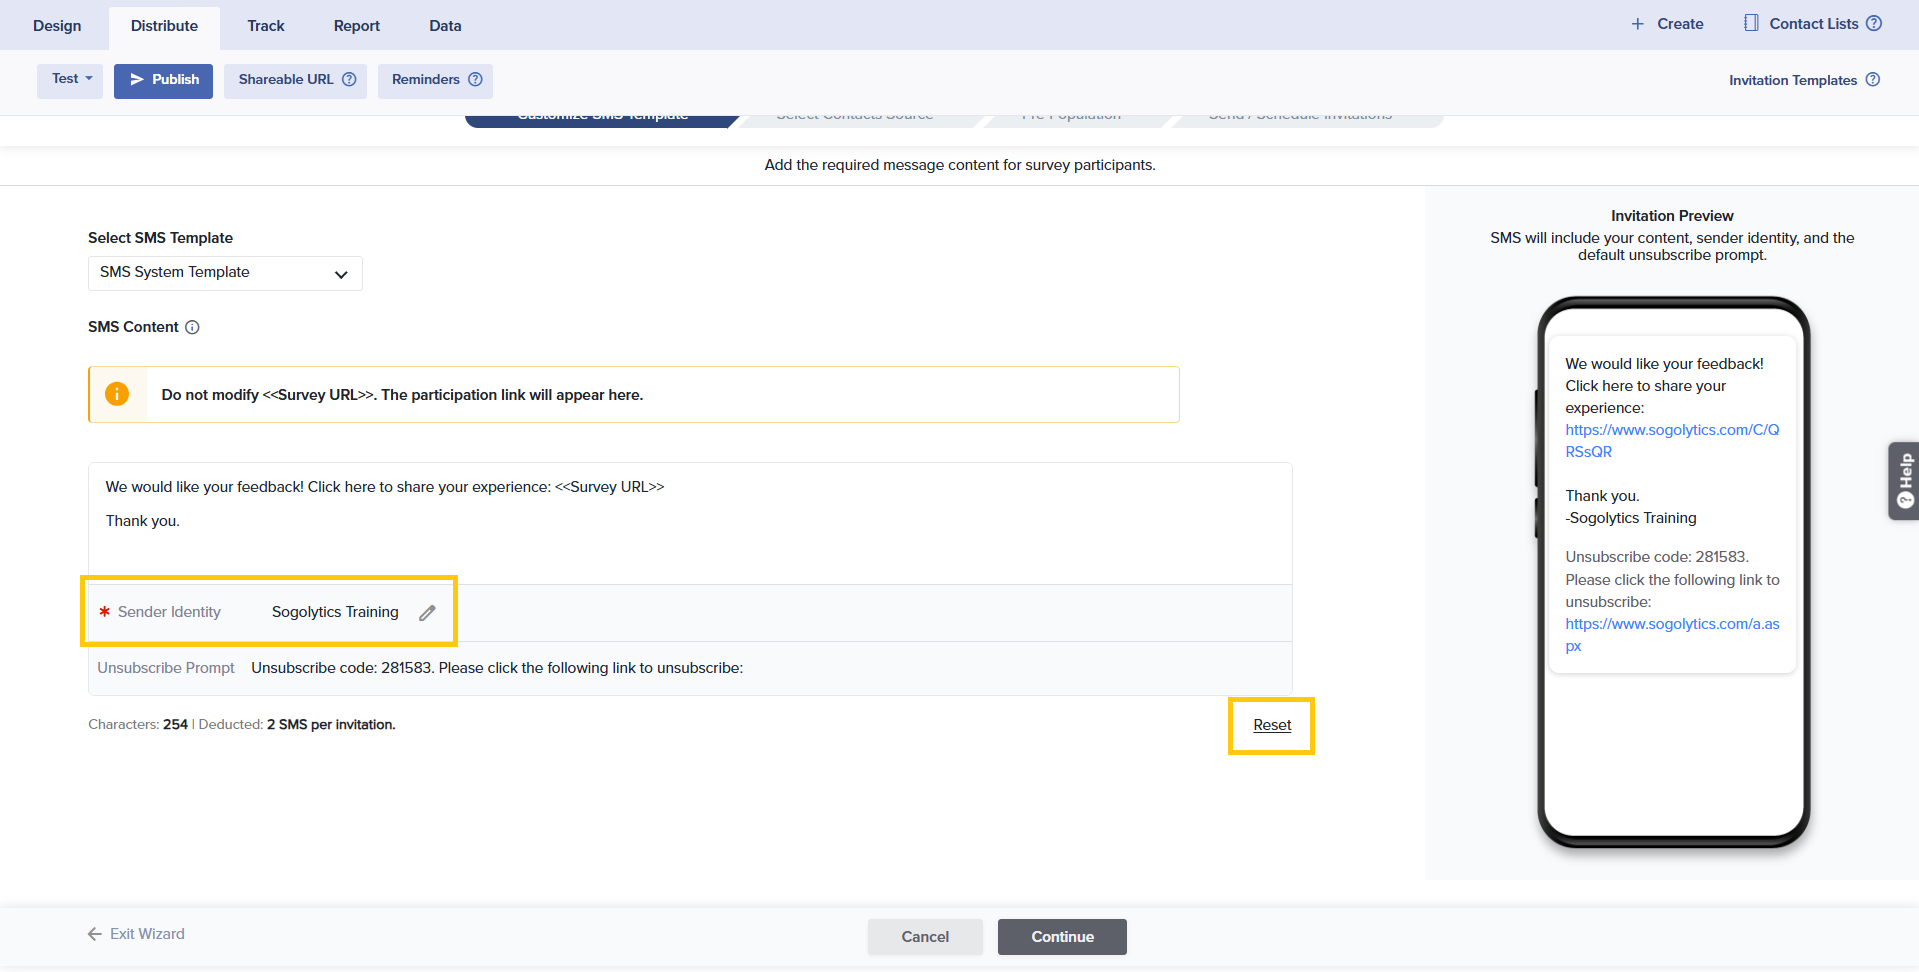
- You can see the demonstration of the selected template in this Wizard. Here you can edit the Sender Identity. You can also Reset this template which will reset the SMS message to system default.
Totals may vary based on character count. A total SMS character count includes the content, sender identity, and unsubscribe message. For a message up to 250 characters, 1 SMS will be deducted from the account. For messages that exceed 250 characters, 2 SMS will be deducted. For messages that exceed 320 characters, 3 SMS will be deducted.
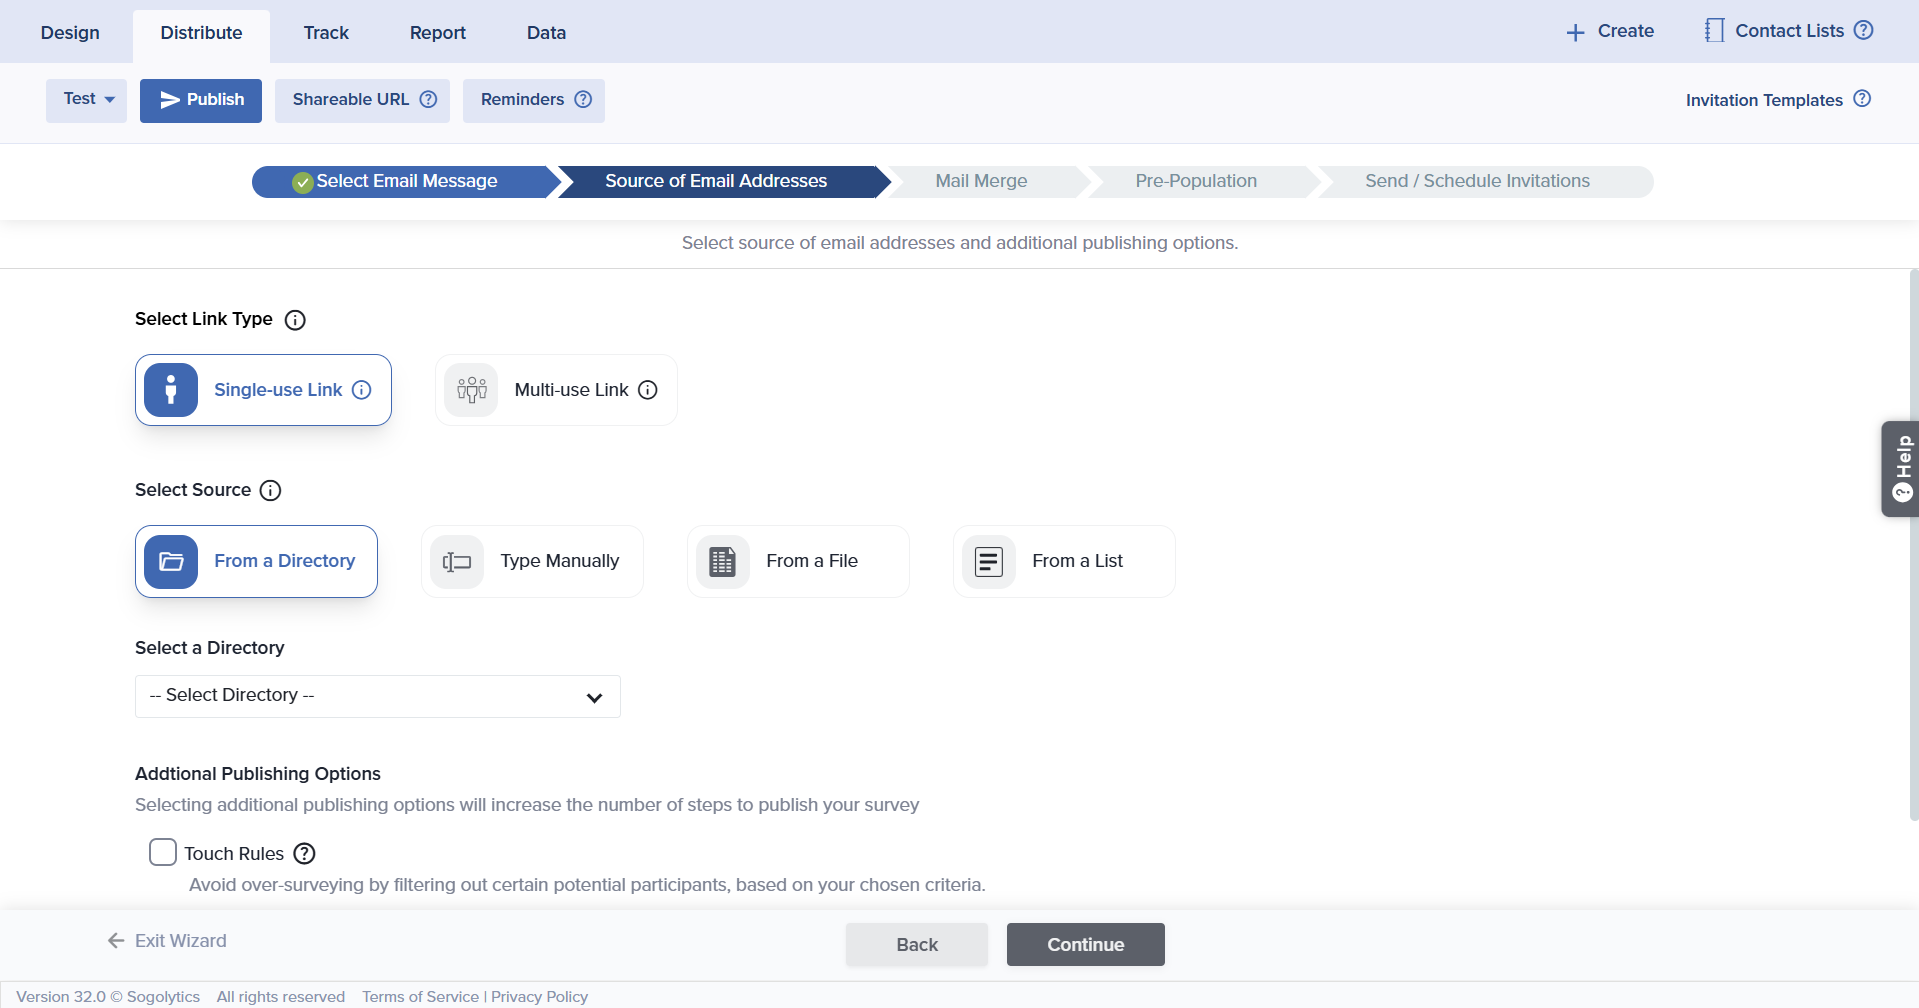
- On Continue, you will be directed to “Select Contacts Source” wizard. Select your preferred link type as Single Use Link.
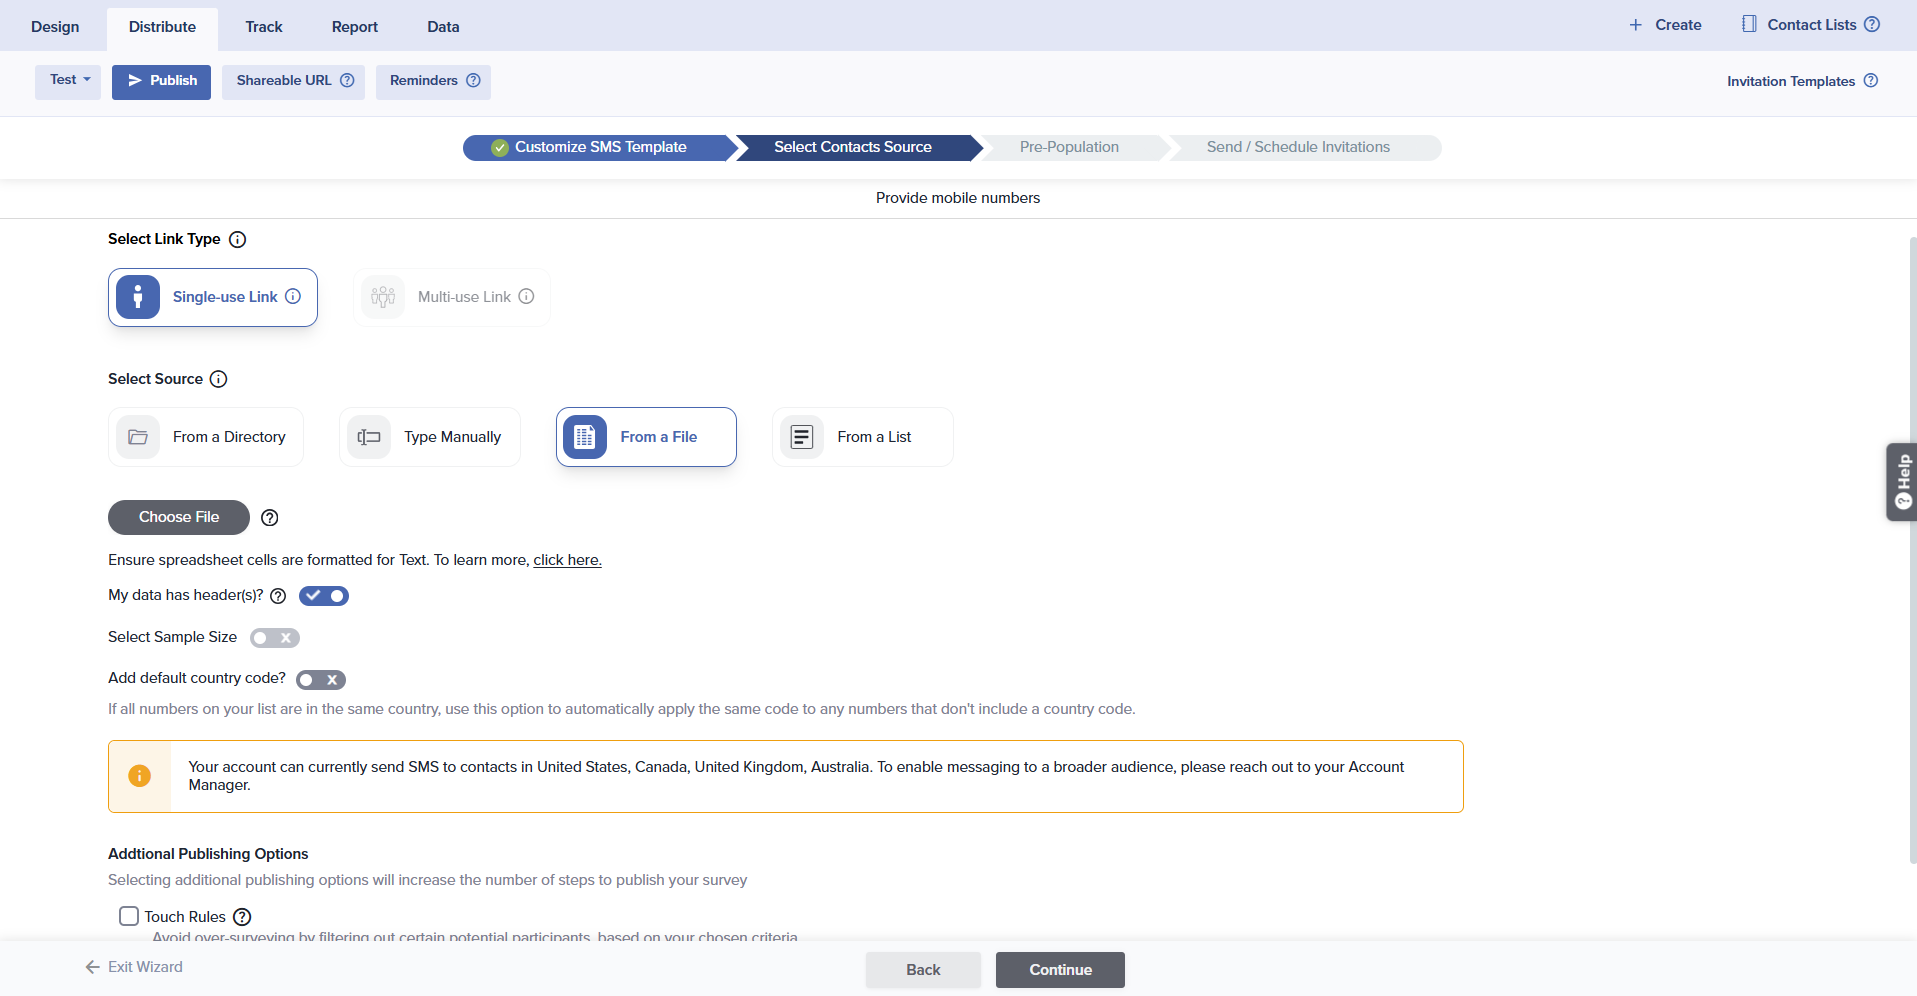
- Next, choose your preferred source from the following options:
- Directory: This option allows you to send invitations to Contacts in an existing Directory. You may also use this option to seek feedback for a specific Activity. To learn more about sending invites using Directory, click here.
- Type Manually: Type or copy/paste phone numbers directly. This option is ideal if you are sending invitations to a small audience or if you don’t have an existing file. Up to 200 phone numbers may be entered at once, separated by commas or line breaks.
- From a File: Upload a list of contacts in .txt, .csv, .xls, or .xlsx format. The file may not exceed 9 MB and it must include mobile numbers in the first column. Read more about supported file formats.
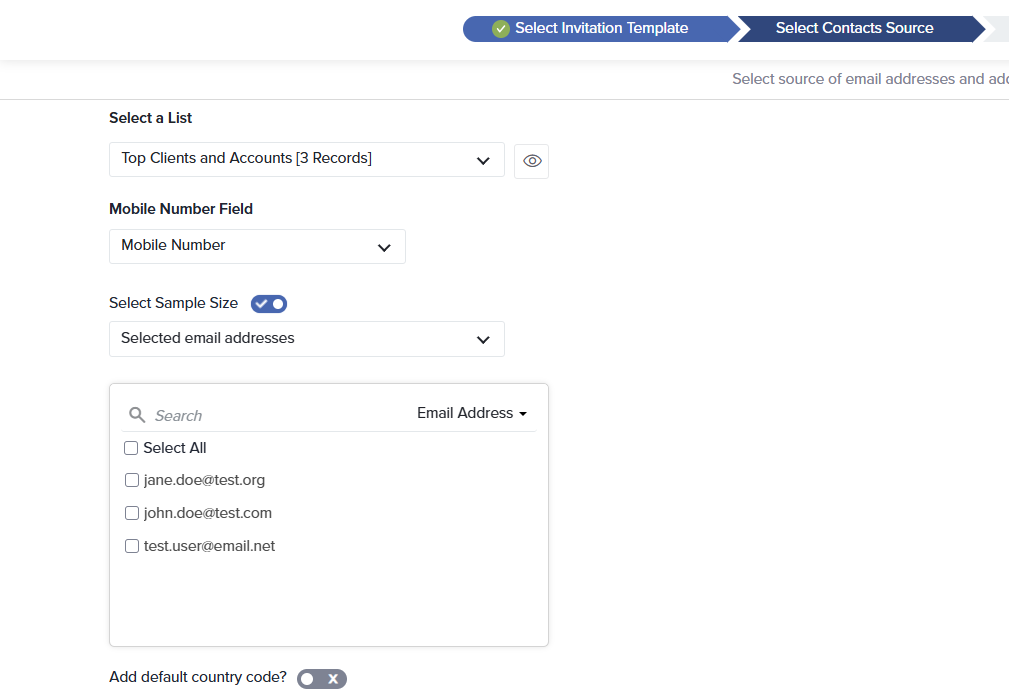
- From a List: Select a List you have built under Contact Lists. Learn how to build a Contact List.
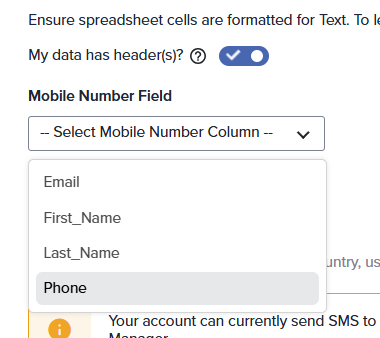
- Once you have selected the source, map the column in which Mobile Numbers are present with the Mobile Number Field.
- If you have selected File or List, you will get an option to select the Sample size. When enabled, you will see the below two options:
- Draw random Sample from all eligible contacts: This option allows you to select a random sample size based on Number or Percentage.
- Selected mobile numbers: This option allows you to select the sample size based on the selected Mobile Numbers.
- In case you haven’t added any county codes to your Mobile numbers, you can use the “Add Country Code” option. This option allows you to automatically add a country code to all your numbers.
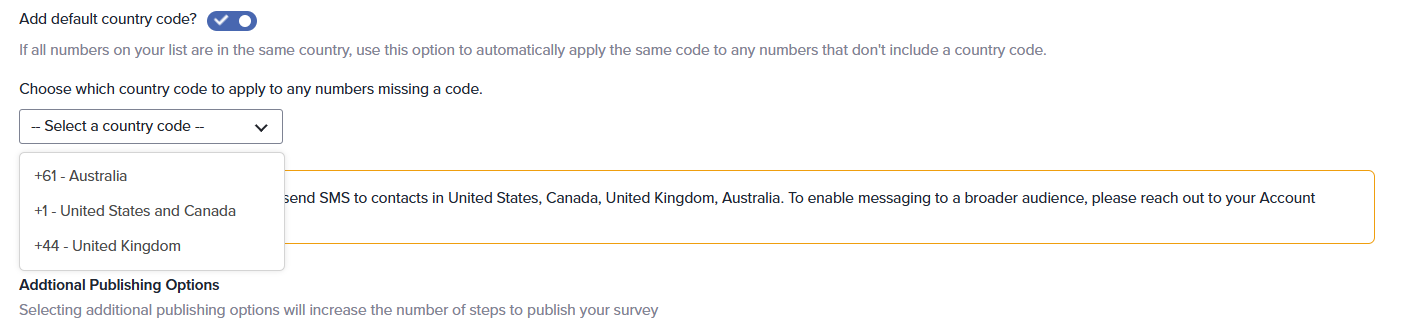
- Under Additional Publishing Options, you may choose to select more advanced features:
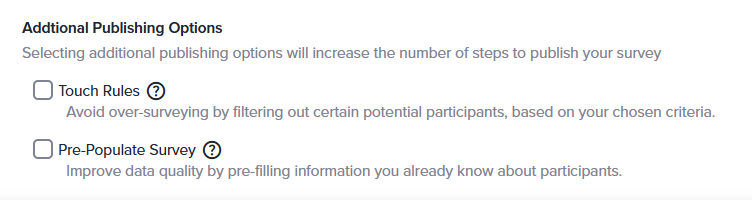
- Touch Rules: Touch Rules makes it easy to avoid over-surveying by filtering out those who have recently participated, eliminating survey fatigue.
- Pre-populate Survey: This option will be pre-selected if pre-population is applied on one or more questions in your survey. You may select the values to be pre-filled for these questions on this step.
- If Pre-Population is used in your project, the distribution wizard will include corresponding next steps. Depending on your distribution method, responses may be entered manually or by mapping columns.
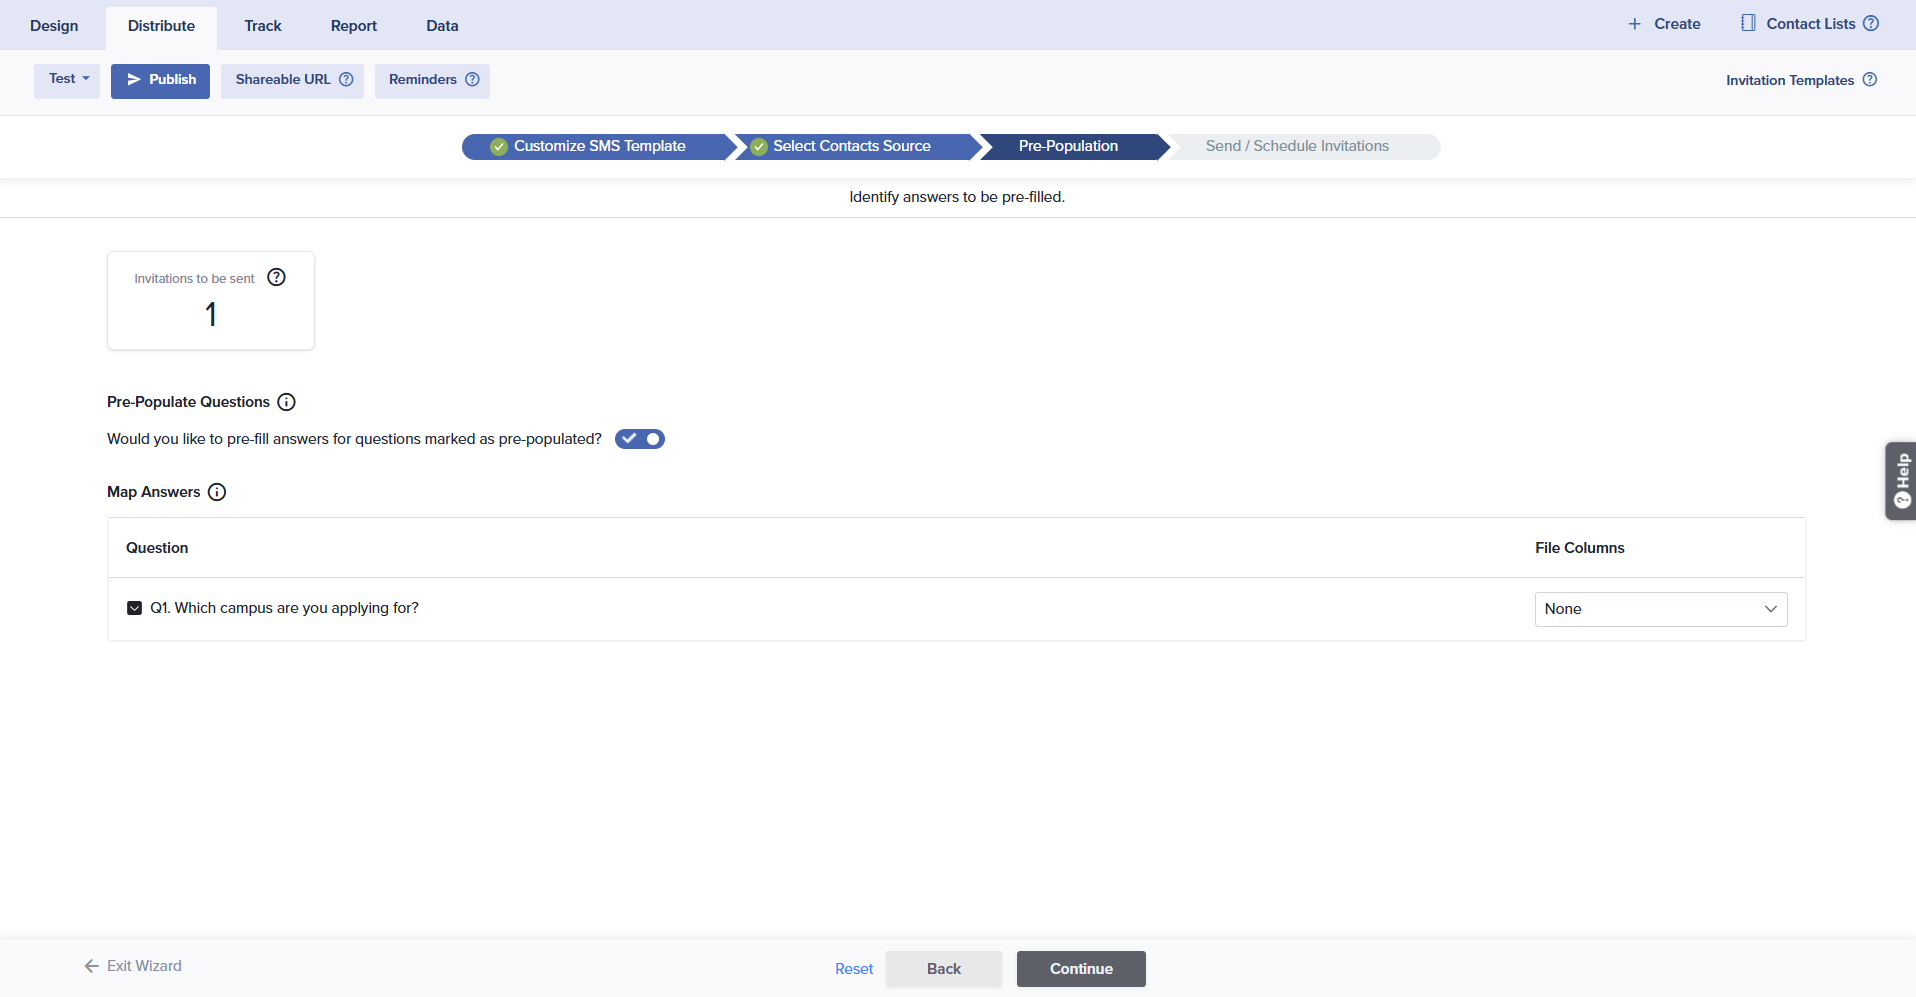 Learn more about pre-populated invitations.
 - Any answer mismatches or blanks can be downloaded and reviewed in the next step. Click continue.
- You will then be directed to the Send/Schedule Invitations Wizard. Here you will see the count of the total number of Invitations and the total number of SMS which will be deducted from your account balance. If your selected source is either Directory or Contact list, you can also opt to schedule automated reminders for SMS invitations.
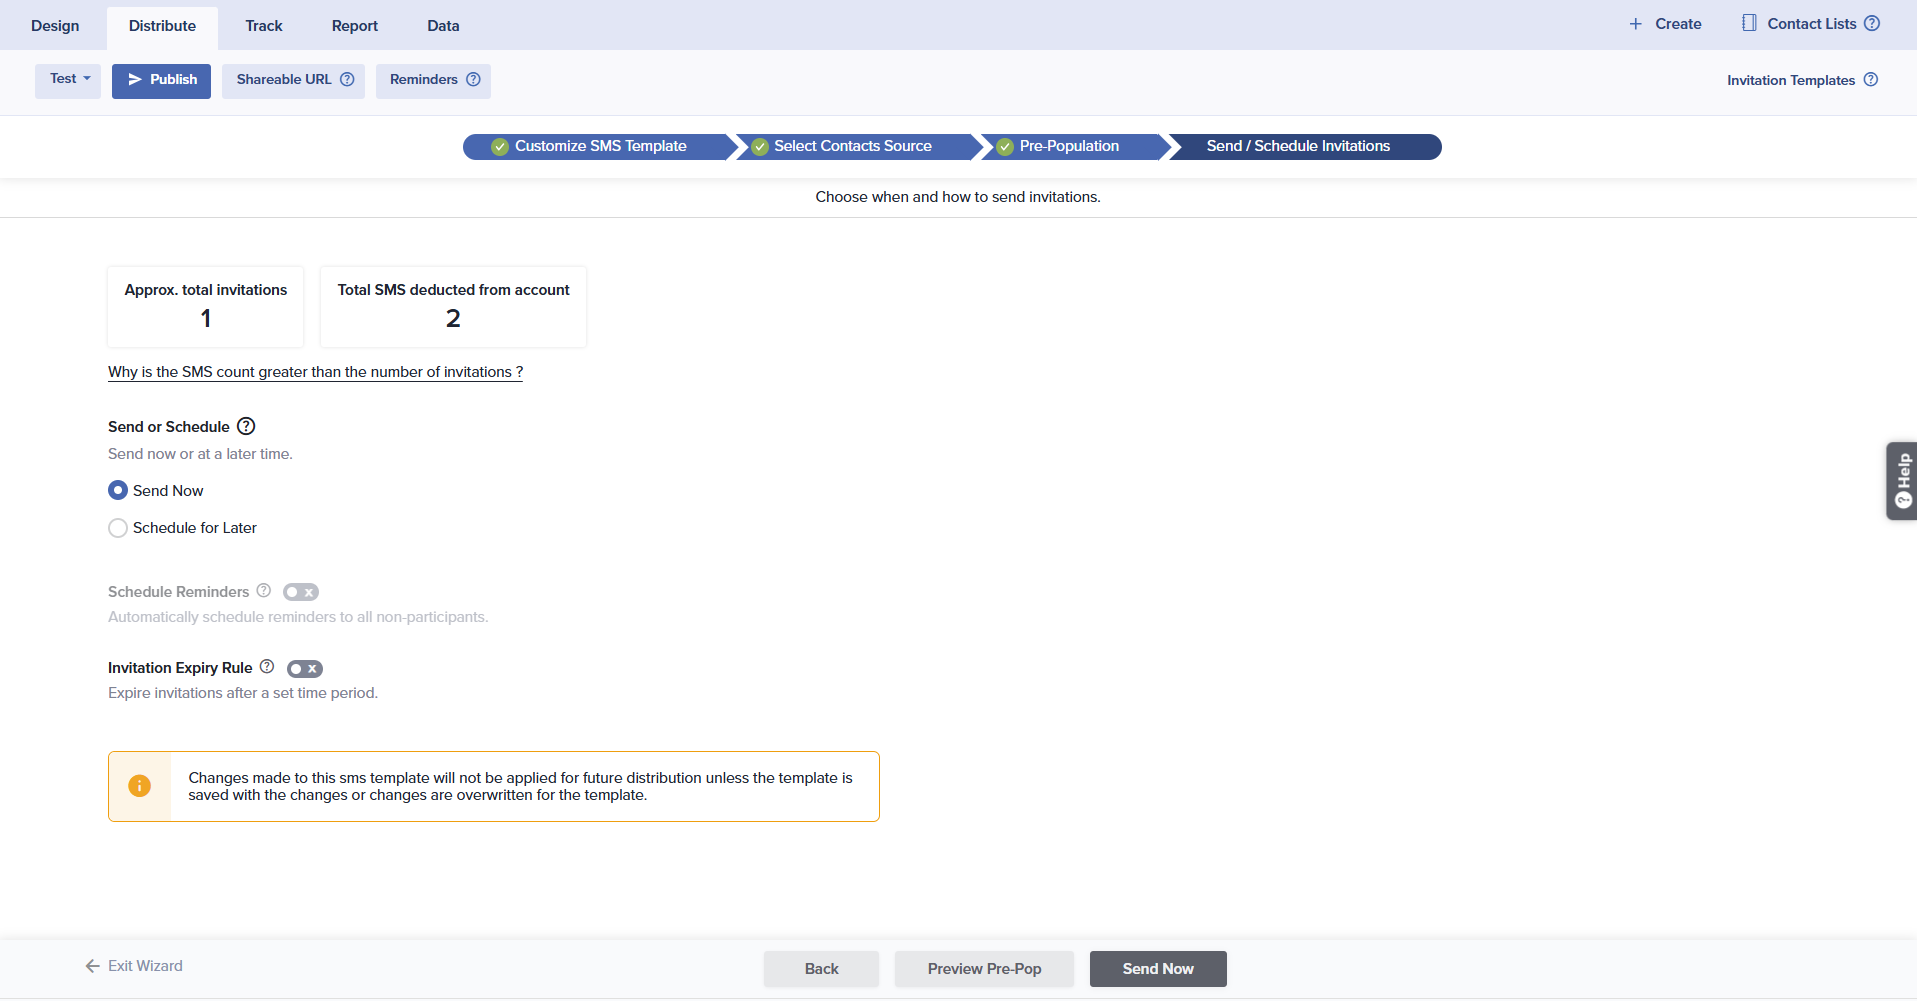
Totals may vary based on character count. A total SMS character count includes the content, sender identity, and unsubscribe message. For a message up to 250 characters, 1 SMS will be deducted from the account. For messages that exceed 250 characters, 2 SMS will be deducted. For messages that exceed 320 characters, 3 SMS will be deducted.
- You also have the option to set Invitation Expiration Options:
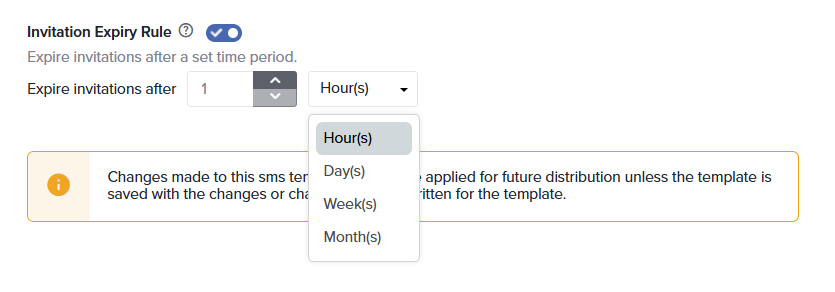
- Set invitations to expire at intervals based on hours, days, weeks, or months from the original invitation.
- Use this feature when the project will remain active but the invitation should not.
- Expiration dates can be viewed and modified from Track.
- Finally, once everything is set, you can choose to send invitations immediately by selecting Send Now or schedule them by choosing Schedule for Later.
Sending SMS and Email Invitations
To encourage participation, you may choose to send a contact both an email and an SMS invitation simultaneously. In order to use this option, you’ll need both a mobile number and an email address for each contact. Sending through this method delivers the same single-use link in both invitations, so participants can only respond through either the SMS or email invitation.
Here’s how:
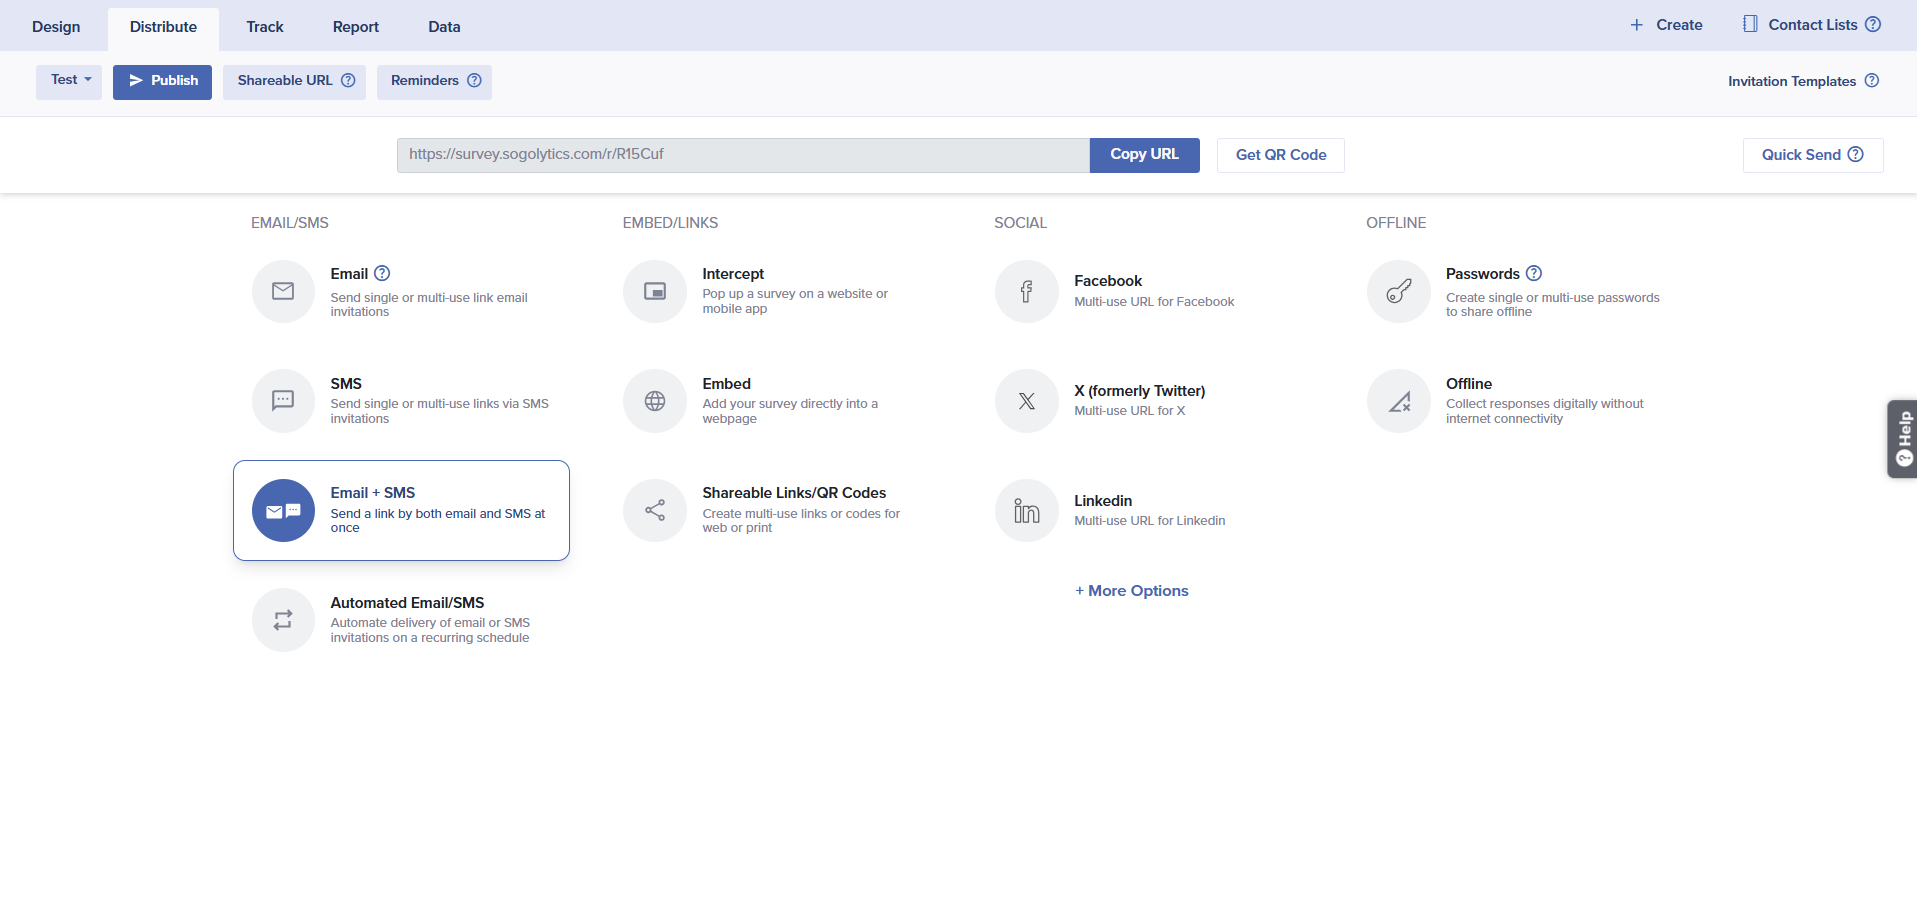
- Select your project, then click on the Publish icon.
- Under the Email column, select Email + SMS.
- In Select Email Message, review the Email Templates created under Invitation Templates.
Once sent/scheduled, the email message cannot be changed.
- Hover over your chosen template, then choose one of the following options:
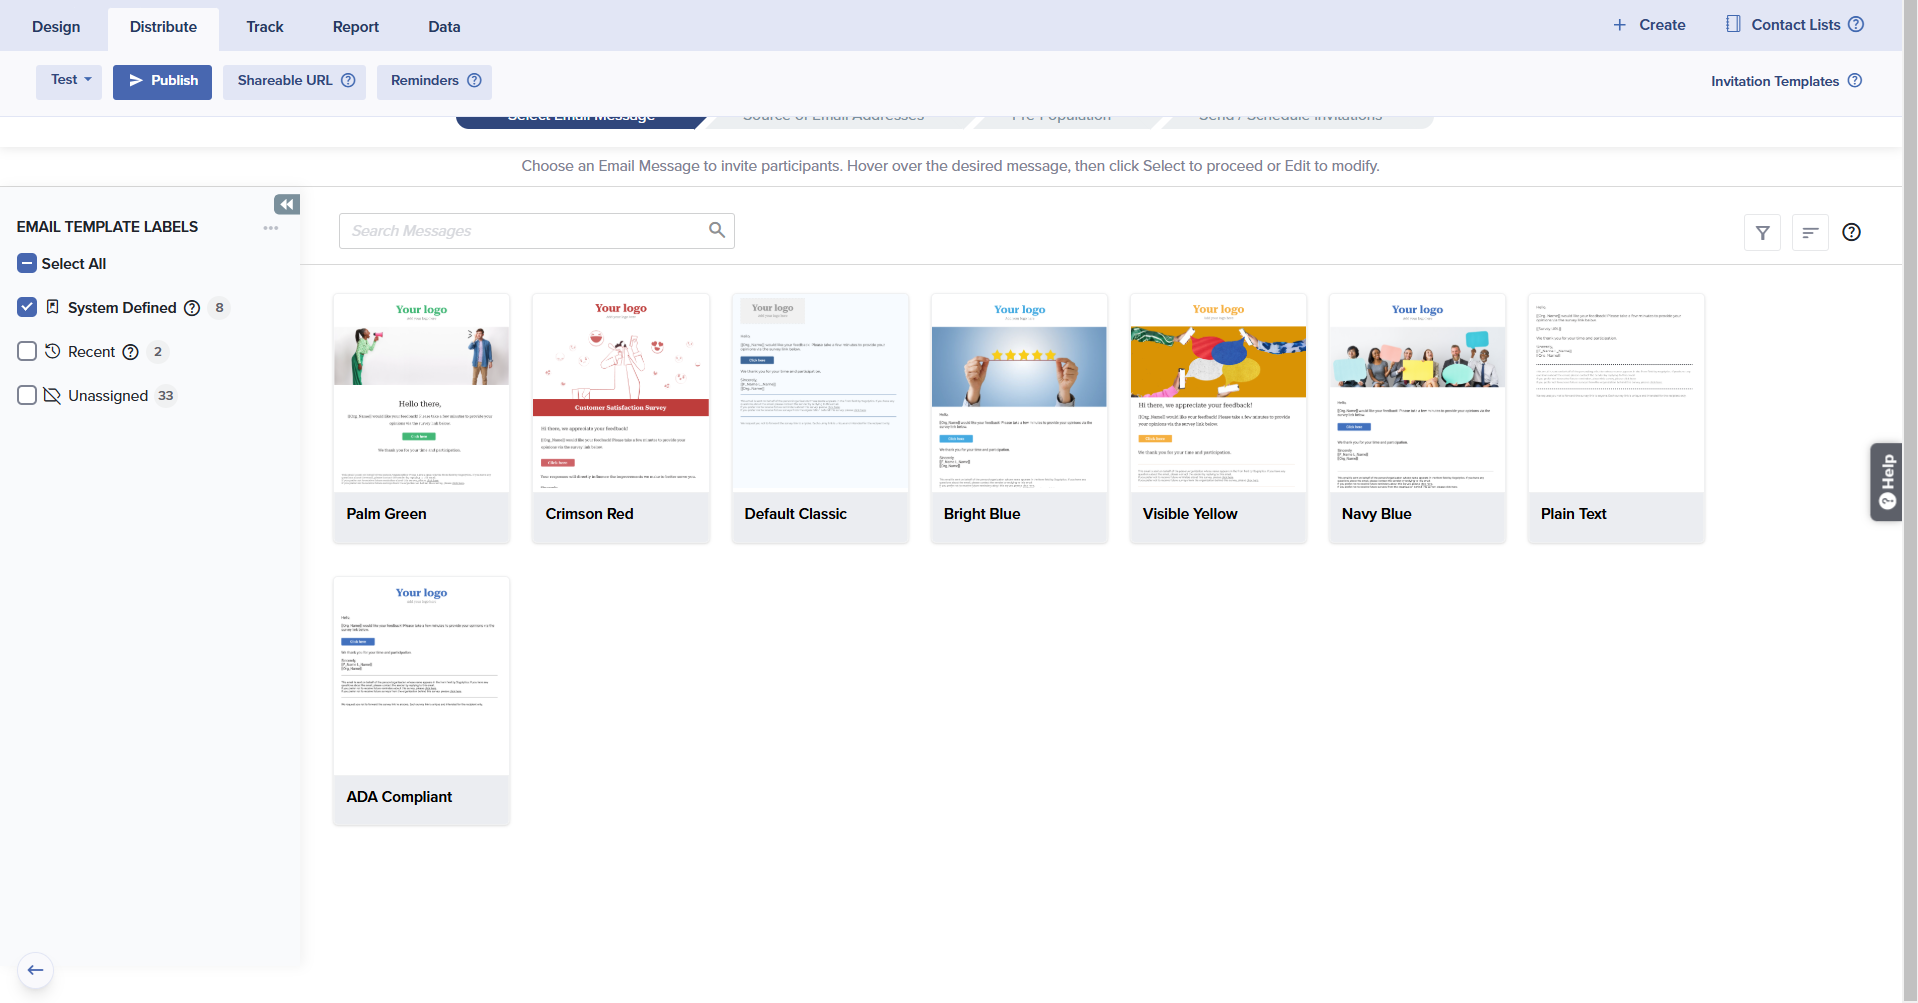
- Select: Choose a template and proceed to publishing
- Edit: Review and edit a message before publishing
- Preview: Preview a message to confirm your choice
- If you’ve chosen to edit the template, complete and save any changes before continuing. You can also embed a question from the project by enabling Embed a Question from the menu on the left and selecting the question you want to embed. Learn more about how to embed a question in your email message.
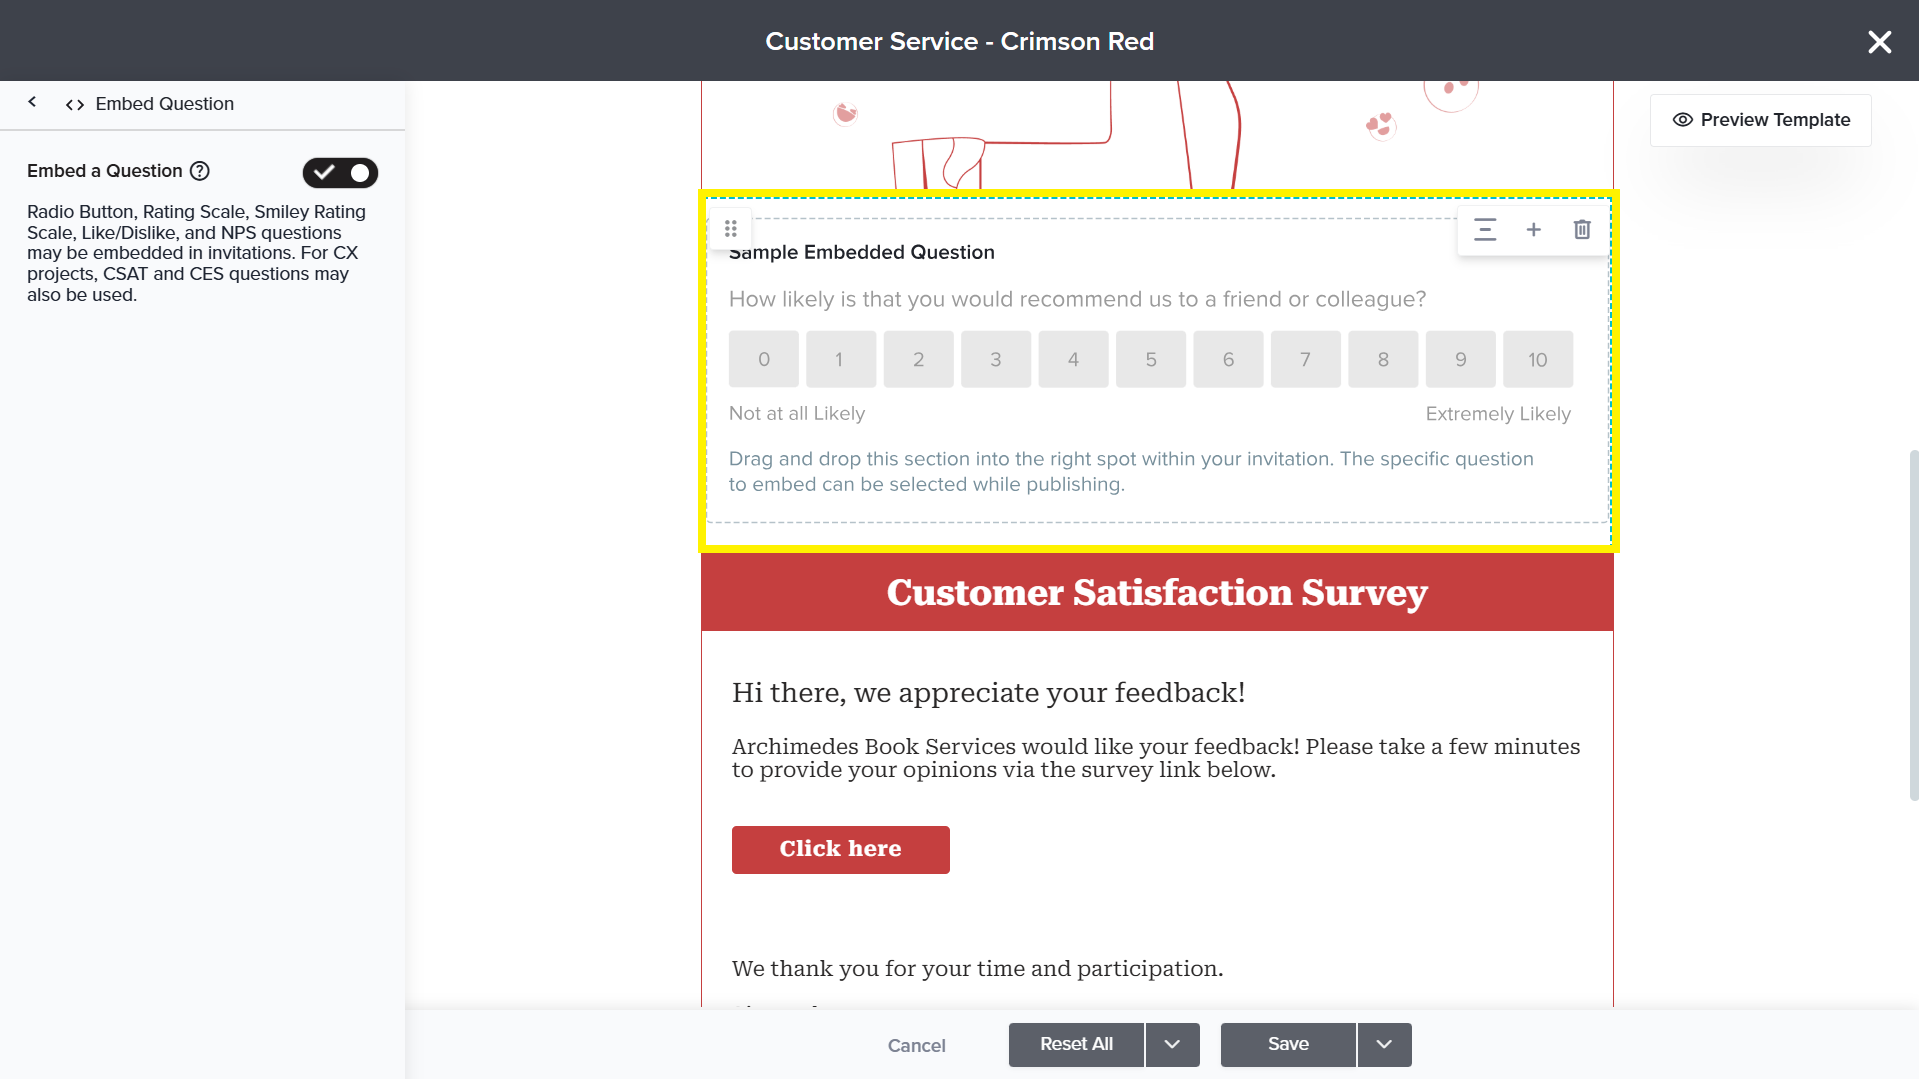
Only Radio Button, Rating Scale, Smiley Rating Scale, Like/Dislike, and NPS questions can be embedded in invitations. In addition, CSAT and CES questions can be embedded in CX project invitations.
- Once you have selected your email template, the wizard to select the SMS template will appear.
- In the ‘Source of Email Addresses’ wizard, select your preferred link type: Single-Use or Multi-Use Link.
- Next, choose your preferred source from the following:
- Directory: This option allows you to send invitations to Contacts in an existing Directory. You may also use this option to seek feedback for a specific Activity. To learn more about sending invites using Directory, click here.
- Type Manually: Type or copy/paste email addresses directly. This option is ideal if you are sending invitations to a small set of email addresses or if you don’t have an existing file. Up to 500 addresses may be entered at once, separated by commas or line breaks.
- From a File: Upload a list of contacts in .txt, .csv, .xls, or .xlsx format. The file may not exceed 9MB and it must include email addresses in the first column.
Read more about supported file formats. - From a List: Select a List you have built under Contact Lists. Learn how to build a Contact List.
- If you have selected File or List, you will get an option to select the Sample size. When enabled, you will see the following two options:
- Draw random Sample from all eligible contacts: This option allows you to select a random sample size based on Number or Percentage.
- Selected email address: This option allows you to select the sample size based on the selected Email Address or Email Domain.
If you have chosen to use a Multi-Use Link, you’ll see an option to restrict the number of times a link is accessed.
- Once you have selected the source, map the column in which Mobile Numbers are present with the Mobile Number Field.
- In case you haven’t added any county codes to your Mobile numbers, you can use the “Add Country Code” option. This option allows you to automatically add a country code to all of your numbers.
- Under Additional Publishing Options, you may choose to select more advanced features:
- Touch Rules: Touch Rules make it easy to avoid over-surveying by filtering out those who have recently participated, eliminating survey fatigue.
- Pre-populate Survey: This option will be pre-selected if pre-population is applied on one or more questions. You may select the values to be pre-filled for these questions on this step.
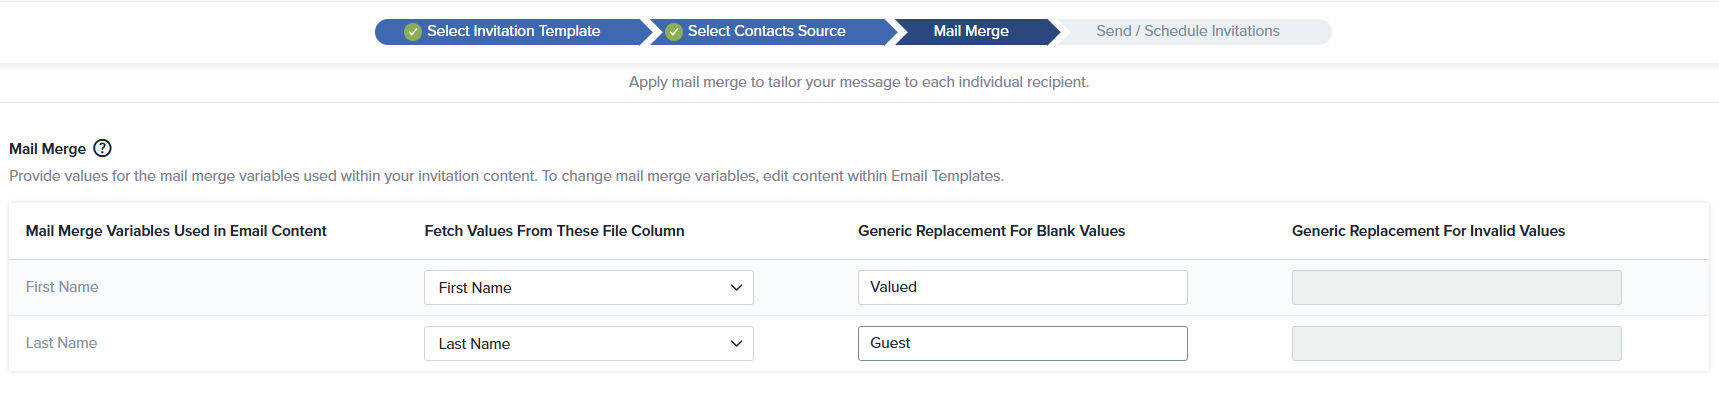
- If you have selected a template that utilizes Mail Merge variables, you’ll be able to map the relevant data fields and fill in generic values in this next step. This will be used for both the original email invitations and the reminder email invitations.
- Reminder Options:
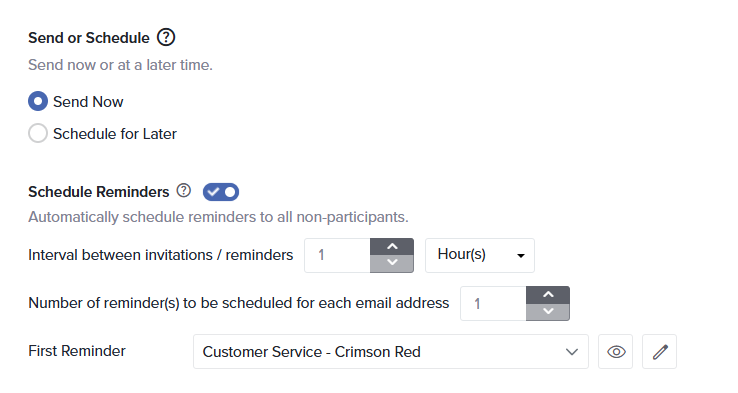
- You can choose to send reminders to non-participants at automatic intervals, with different Email Message for each, as desired.
- Choose to schedule reminders at intervals based on hours, days, weeks, or months from the original invitation date.
- Scheduled reminders are automatically cancelled if responses are submitted.
- Up to 2 reminders can be sent automatically.
- If your selected source is either Directory or Contact list, you can also opt to schedule automated reminders for SMS invitations.
- Invitation Expiration Options
- Set invitations to expire at intervals based on hours, days, weeks, or months from the original invitation.
- Use this feature when the project will remain active but the invitation should not.
- Expiration dates can be viewed and modified from Track.
If automatic reminders are scheduled for a set of invitations, the invitations cannot be expired before the reminders are sent.
Keyword-Based Unsubscribe Prompt
The Keyword-Based Unsubscribe Prompt is an optional feature that allows recipients to unsubscribe from SMS survey invitations by replying with a simple keyword like “STOP.”
Here’s how this works:
Your survey invitation messages can include two types of unsubscribe prompts, automatically applied based on the recipient’s region and local SMS regulations:
- Code-Based Unsubscribe Prompt: Shown to contacts in regions where replying with a keyword like STOP is not supported due to regulatory or technical limitations. Recipients will see a unique unsubscribe link in the message instead of a keyword-based instruction.
- Keyword-Based Unsubscribe Prompt: Shown to contacts in countries or networks that allow “STOP” or similar replies to opt out of SMS messages. These contacts can simply reply with “STOP” to unsubscribe.
Note: This feature is available only in accounts set up with dedicated phone numbers. Please talk to your account manager for details.
How to Enable this Setting
If you have enabled a dedicated From Phone Number functionality in your account, the system automatically determines which type of unsubscribe prompt to include, based on the recipient’s country and carrier compatibility.
- Enable keyword-based unsubscribe prompts for supported regions.
- Allow the system to fallback automatically to a code-based unsubscribe link where keyword replies are not supported.
Good to know: Not all countries or carriers support keyword-based unsubscribe replies. Below is a list of countries which support keyword-based optout, along with their country codes.
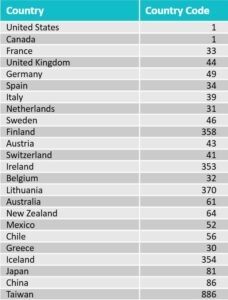
In unsupported regions (the one which are not part of above list), the system defaults to code-based prompts to ensure recipients can still opt out.
Even when keyword-based opt-out is enabled, success may vary due to regulatory, technical, or carrier-level restrictions.
Subscribe for tips and insights to drive better decisions!