Launch Project
Can you share some suggestions about project distribution?
Definitely! Here’s our quick video on a few best practices in distribution:
Do you have any suggestions about avoiding common distribution mistakes?
Sure! Take a look at our video on common distribution pitfalls and how to avoid them:
How do I get a link to put on my website or to send out via my own email?
- Select your project, then choose Publish.
- At the top of the page, click Generate URL.
- Click Copy.
I have an Excel file with email addresses. How can I use it to send out my projects via email?
You have two options:
- While publishing, upload your Excel file when prompted to choose the source of addresses.
- Create a List within Contact Lists prior to publishing to simplify publishing and improve the quality and organization of your distribution. This method is recommended. Click here to learn more about how to create a List from email addresses.
If you’re using any additional attributes for either Mail Merge or Data Population, each attribute should be its own additional column.
Why doesn’t my List appear in the dropdown when I’m trying to publish?
If the List you build is not showing up, it is likely that your list was created using Unique IDs rather than Email addresses. Please recreate your list in the Contact Lists and be sure to identify the List type as Email Address List in the first step.
Why aren’t my invitations being delivered to my recipients’ inboxes?
There are several reasons why your invitations may not be making it to your recipients’ inboxes. Common reasons include: the person’s inbox is full, their email address was typed incorrectly, their mail server does not accept HTML emails, or the recipients’ server was inaccessible. Emails can also get caught in spam filters if they resemble a piece of spam mail, so it is important to customize the subject line and body of your invitation message. Check out these best practices on email delivery to improve your distribution.
How do I reschedule my email invitations?
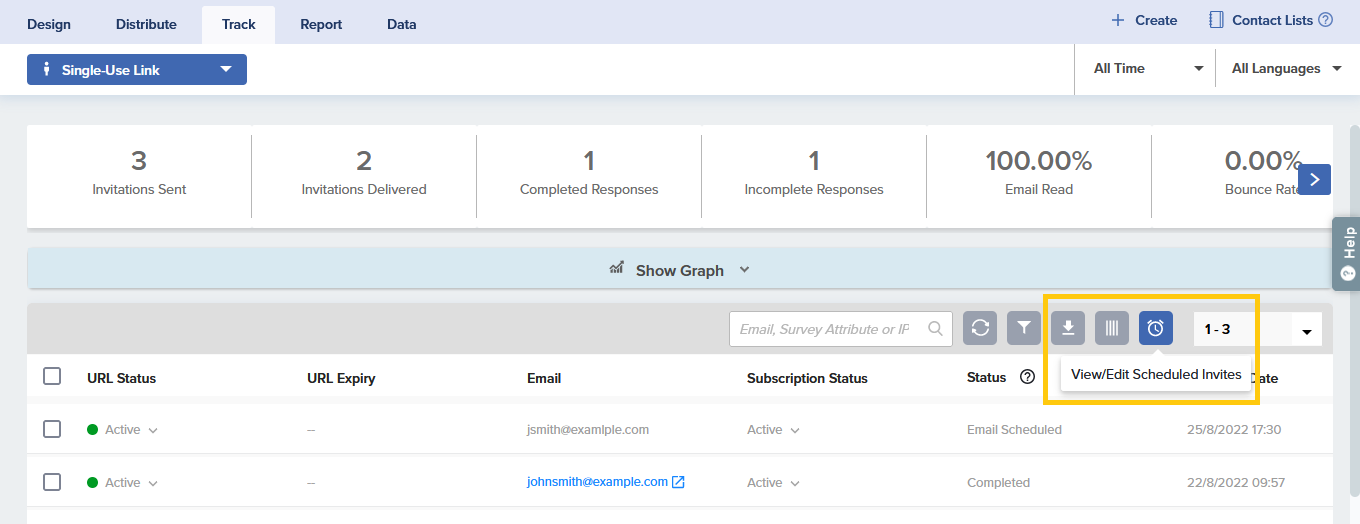
On the Distribute menu bar, click on Track. Choose the distribution method you used to schedule your invitations (Single-Use or Multi-Use Link) by clicking on the relevant option from the dropdown menu. Then, click on the View/Edit Scheduled Invites button to reschedule.

How do I send invitations to a few people and NOT the entire list?
- When publishing, choose ‘From a List’ as the source of your addresses.
- In the dropdown that appears, choose ‘Selected Email Addresses’.
- Click on the chosen email addresses on the left and click on the Add icon to transfer them to the box on the right.
- Continue publishing, and only selected email addresses will receive the invitations.
Can I send more than one email invite to the same email address?
Yes, you can send multiple email invitations to the same email address. To do so, when building your List, make sure to allow for duplicate email addresses to be loaded.
How do I send reminders to people I’ve already invited to participate?
If a project is launched through either Single-Use or Multi-Use Link email invitations, you may choose to send Reminders. For Single-Use Links, only those who have not yet participated will be eligible to receive Reminders. For Multi-Use Links, you may choose to send to addresses that have not participated and/or those that have.
- Under Distribute, select your project.
- On the Distribute menu bar, click Reminders.
- Choose who should receive Reminders:
- If you would like to send Reminders to only selected Email addresses, check the box to the left of each address and click Send/Schedule Reminder.
- If you would like to remind everyone, click Send/Schedule Reminder to All. Click OK on the pop-up prompt.
- Follow the wizard to send your Reminders immediately or schedule them for later.
I accidentally sent out real invitations to my project when I meant to send out test invites. Now I need to edit my project but I’m unable to do so. What should I do?
If the responses you have received are not important for your dataset (for example, the respondents were only reviewing your project formatting but you aren’t interested in their actual answers) then you can delete their responses to return your project to Edit mode. To delete the responses, follow the steps below:
- Select your project. From the Distribute menu bar, click Track.
- Select all email addresses and click Delete. All selected invitations and their responses will be deleted. Note: This action cannot be undone.
If you do not wish to delete the already submitted responses but need to make edits to your project, please contact support for details on possible options.
What should I do if I sent invitations instead of reminders?
If you have already sent invitations and want to encourage participation, you should send Reminders. Here are a few reasons why:
- Sending a new invitation means the same person receives multiple invitations and appears multiple times in your tracking list.
- If a recipient responds to multiple invitations, you will need to clean up your reports.
- Sending more invitations decreases your available invitation balance.
If you have already accidentally sent duplicate invitations, you can try to clean up your distribution list by deleting invitations that have not been responded to. Consider the best resolution before you proceed, because a deleted invitation cannot be retrieved.
If you sent the first invitations on Monday and then sent new invitations on Wednesday, review Track. Filter to review the invitations sent on Monday. If nobody has responded, delete them all and leave the Wednesday invitations alone. If example@example.com already responded on Monday, you can keep that person’s Monday response and delete their Wednesday invitation.
Here’s how:
- Select your project and go to Track.
- Click on the Filter icon.

- Click on Invitation Date, and then provide the date you’d like to review [in the example above, Monday] and Save to filter.

- Review all the email addresses to which the invitation was sent on the selected date. Choose those that you would like to delete by checking the box to the left of each row, or by selecting all of them from the check box at the top of the list.
Reminder: Deleted invitations and their responses cannot be retrieved. If you delete an invitation that has already been completed, the data from that response will be lost.
- Once all desired responses are selected, click the Delete button in the top left.
- Review the warning messages, clicking OK to proceed if you agree that the invitation(s) can be disabled and deleted.

- Finally, confirm the action by typing the word DELETE and then clicking the button.

- Once this process has been completed and each invitation has been deleted, recipients who click the invitations in their inbox will see the message that the survey is no longer available. This message can be updated under Event Messages within Design.
How can I change the name and email address found in my email invitation?
Email invitations can be modified under Email Templates. Hover over the relevant fields and make your changes. Note: If you change the Sender Email Address field, you will be required to verify this address.
How do you cancel a launched survey?
If you have sent our your invitations already, you cannot undo or cancel. However, if you have scheduled your project launch for a later date, here’s how to cancel it:
- On the Distribute menu bar, click on Track.
- Choose the distribution method you used to schedule your invitations (Single-Use or Multi-Use Link) by clicking on the relevant card or from the dropdown menu.
- Click on the View/Edit Scheduled Invites button.
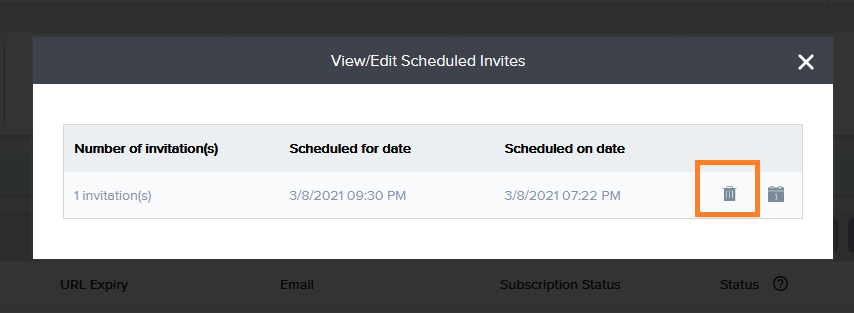
- On the card click delete icon next to the batch of invite you’d want to cancel.

How can I activate Track?
- Data is automatically displayed in Track based on distribution and participation.
- If you have sent out invitations, Track will display both their delivery and participation status.
- If you have used a Shareable URL, Track will display data as soon as your first response comes in.
Subscribe for tips and insights to drive better decisions!


